
Let’s be honest — most of us have looked at a beautifully detailed doll’s house and thought, that’s nicer than my apartment. Tiny furniture, cute windows, perfect little staircases… it’s the kind of thing that makes you want to shrink down and move in. But here’s a twist: what if your hamster could?
Transforming a doll’s house into a hamster cage is one of those DIY projects that looks whimsical online but actually works surprisingly well in real life — if you do it safely. It’s creative, budget-friendly, and gives your furry friend a home with real charm. And, let’s face it, it’s also a lot more fun to design than a store-bought plastic cage that rattles every time your hamster sneezes.
Whether you’ve found an old dollhouse at a thrift store or have one collecting dust in the attic, you can easily turn it into a cozy, functional hamster home. You’ll need a bit of imagination, some safe materials, and a little patience. But once you’re done, you’ll have something that looks like it belongs on Pinterest and keeps your hamster happy. Here’s how to do it step-by-step.
1. Choose the Right Doll’s House
Not all dollhouses are made equal when it comes to hamster safety. Look for one made from solid wood or thick MDF rather than plastic — wood breathes better and feels more natural for your pet.
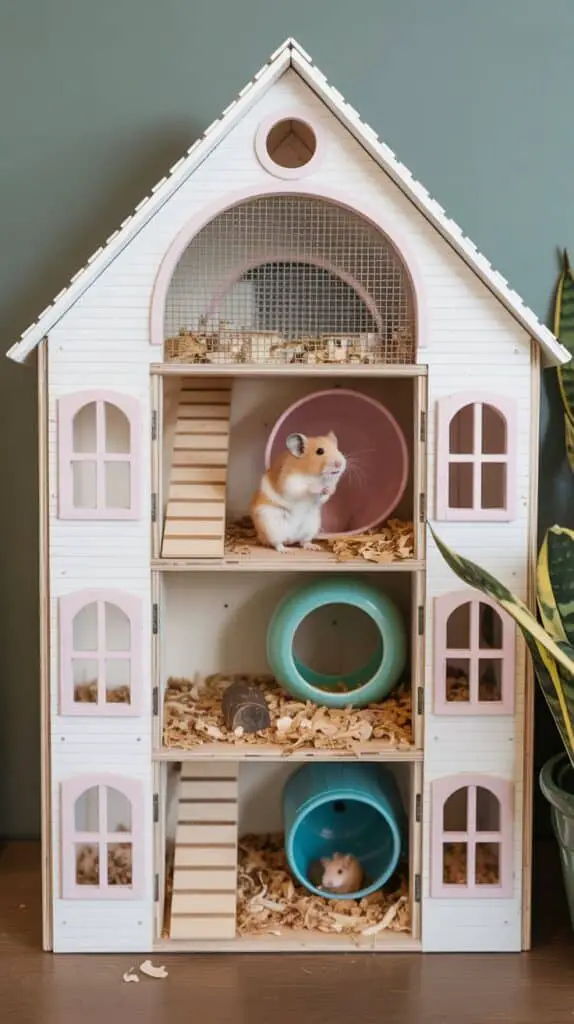
The ideal house should have multiple levels with open spaces for nesting, eating, and exploring. Avoid anything with paint or varnish unless you plan to sand and reseal it with pet-safe coating. Dollhouses around 2–3 feet tall work best — big enough for enrichment but still manageable for cleaning.
If you’re reusing a vintage one, inspect it carefully for nails, staples, or loose glue. A few minutes of prep now can save your hamster from sharp surprises later.
2. Remove Unsafe Materials and Add Ventilation
Once you’ve chosen your base, it’s time to make it hamster-safe. Remove any carpet, fabric wallpaper, or decorative stickers — these can trap bacteria or tempt your hamster to chew (and they will).
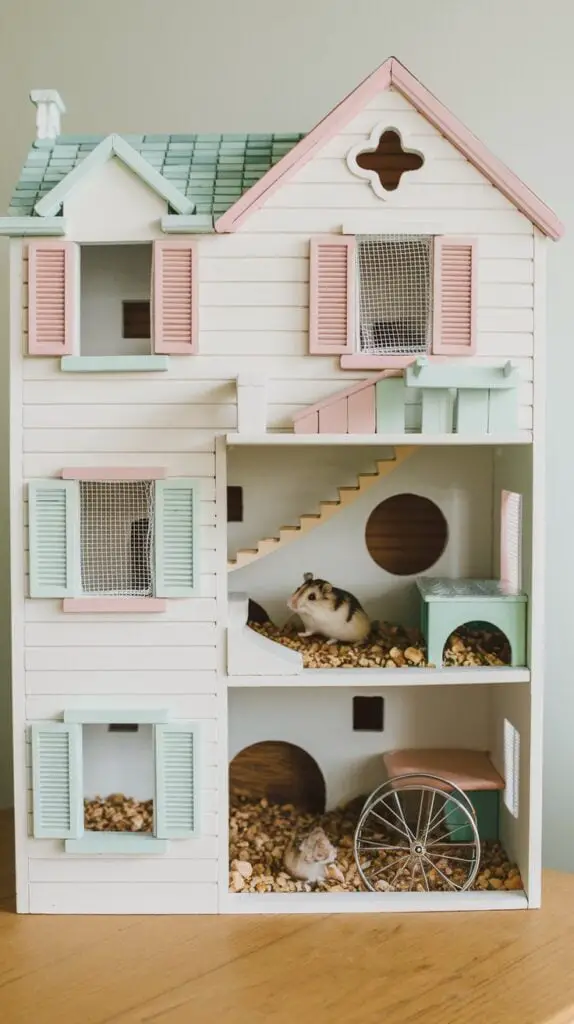
Cut ventilation holes in the sides or back if the house doesn’t already have them. You can attach wire mesh or metal grilles to keep airflow steady while preventing escapes. Avoid chicken wire or anything sharp-edged — look for fine, smooth mesh that’s chew-proof but safe on tiny paws.
If the dollhouse has glass or plastic “windows,” consider replacing one or two with breathable mesh panels for extra airflow. Hamsters thrive in well-ventilated spaces, and it’ll help reduce odours too.
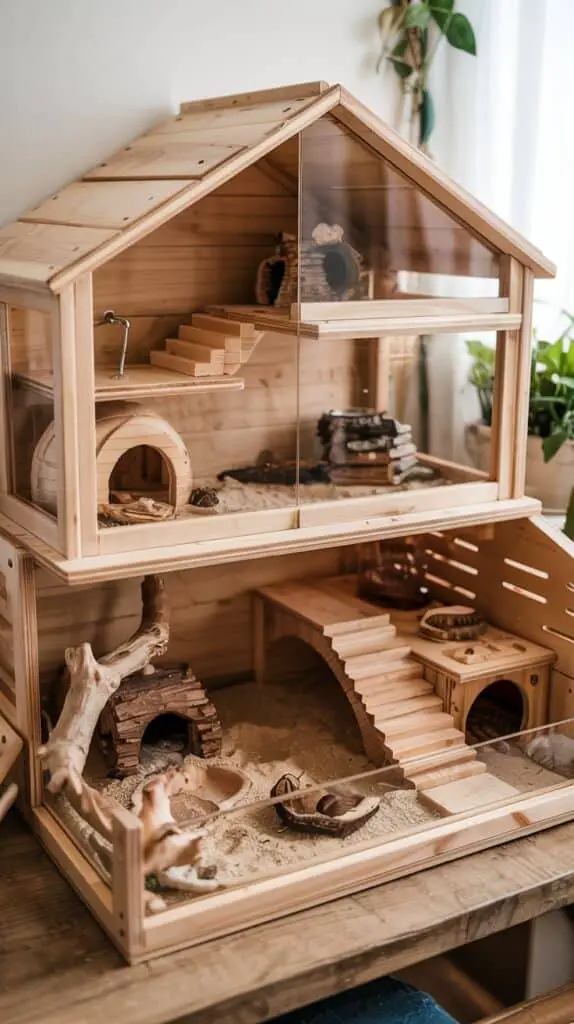
3. Reinforce the Floors and Walls
Hamsters love to dig — and chew. Thin or hollow floors in dollhouses might not hold up to burrowing or bedding weight. Strengthen each level by gluing an extra layer of untreated plywood underneath, or even removing the upper floors completely if you want an open-plan design.
Line the base with a plastic or acrylic tray that fits snugly and is easy to remove for cleaning. You can find these in kitchen or garden sections of most stores. For extra protection, seal any seams with non-toxic aquarium-grade silicone to prevent leaks or mess.
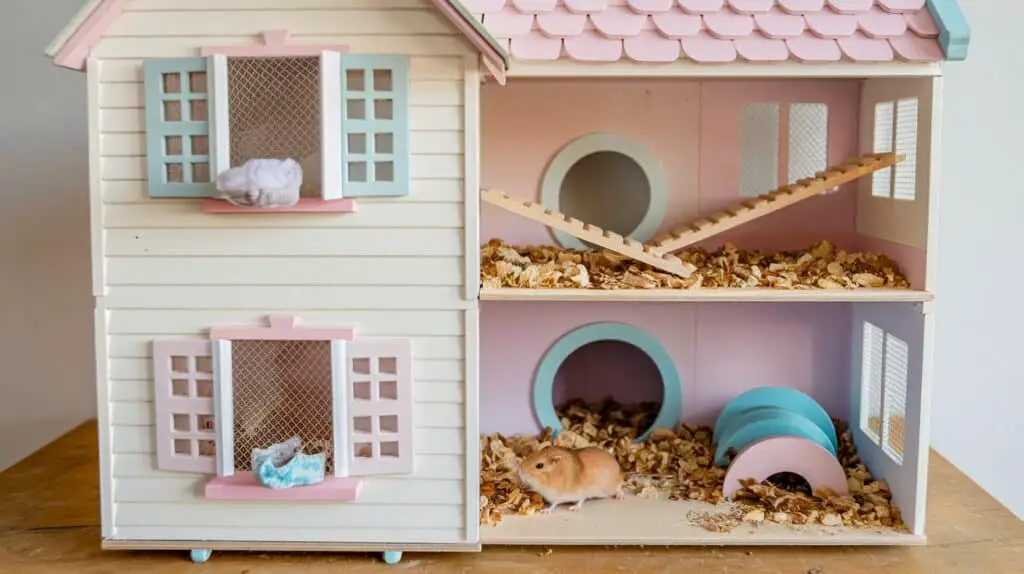
4. Create a Hamster-Friendly Interior Layout
Now comes the fun part — decorating! But remember, this is your hamster’s world, not just a design project. Keep the layout simple, cozy, and easy to clean.
Designate one “room” for sleeping and nesting, one for eating, and one for play. Replace doll furniture with hamster-safe décor — wooden bridges, tunnels, and hideouts. Avoid anything painted, plastic, or with fabric upholstery. You can use shredded paper, coconut fiber, or soft bedding to fill the floor areas for burrowing.
If you keep multiple levels, connect them with ramps or tunnels made from wooden tubes or cardboard rolls. Always make sure there’s no high drop your hamster could fall from — they’re not great at judging heights.
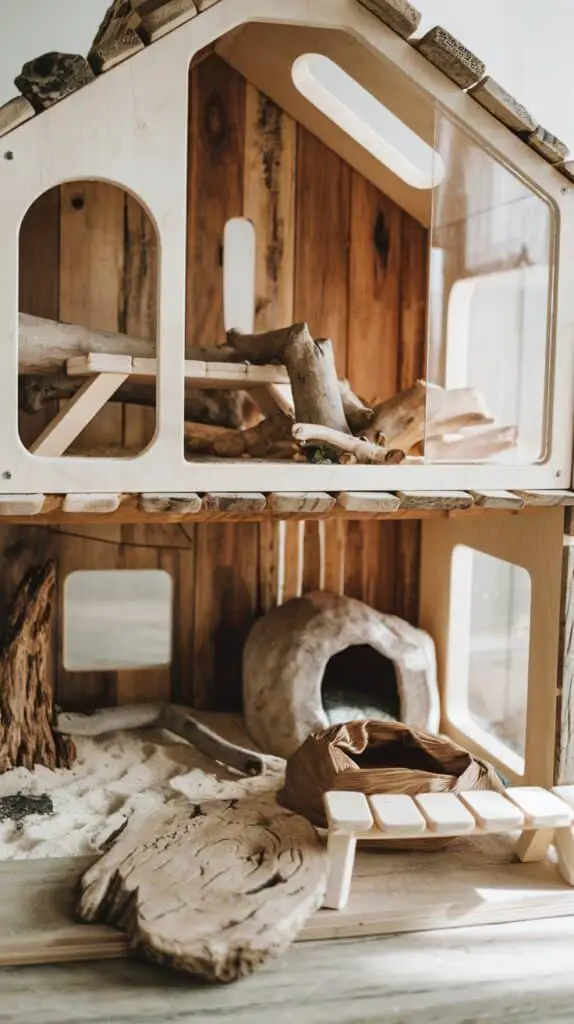
5. Add Enrichment and Natural Details

To make your hamster’s new home feel like a real habitat, add natural materials like driftwood, rocks, and dried moss (all cleaned and pet-safe). You can even incorporate elements from hamster scaping — small plants, bark tunnels, and textured layers that mimic outdoor terrain.
A sand bath on one level adds both fun and hygiene — just use chinchilla or reptile sand (never dust). Hide a few treats or seeds around different “rooms” to encourage foraging and exploration.
And yes, it’s perfectly okay to make it beautiful. A soft neutral palette, little wooden ladders, or even a handmade sign with your hamster’s name — it all adds charm without compromising function.
6. Secure the Roof and Openings

Even the cutest hamster setup is useless if your little explorer escapes. Replace the dollhouse roof with a secure mesh lid or hinged frame that locks in place. This keeps airflow steady while making cleaning easy.
If the house opens from the front, install magnetic catches or small latches to keep doors closed. Make sure gaps between levels are sealed or blocked off, so your hamster can’t wedge itself into dangerous spots.
Final Thoughts
Turning a doll’s house into a hamster cage is part DIY, part dream project — and totally worth the effort. It’s creative, sustainable, and gives your hamster a home that feels like an adventure.
But most importantly, it’s a reminder that small pets deserve thoughtful design too. They might be tiny, but they have big personalities — and giving them a space that reflects that is pure joy.
So go ahead — dust off that old dollhouse, grab your glue gun, and start creating. Because when it’s done, you won’t just have a hamster cage. You’ll have the tiniest, coziest home on the block — complete with a very proud new homeowner inside.